Descending on Long, Skinny Rocket Skis
The skis I used this time were Madshus Glittertind MGV+, 200 cm long, with dimensions of 68-55-62.
I also have a similar pair at home ? the Madshus Voss MGV+, also 200 cm, with dimensions of 60-50-55.
Compared to the ski I usually use for backcountry cross-country ーthe Panorama M62 (172 cm / 83-62-70) ーthese are much narrower and considerably longer. On top of that, they
have a strong camber.
Because of that, they feel great when traveling. The camber gives a lively rebound, and being long and narrow, the skis naturally want to go straight. Traveling on them feels wonderful.
And when traveling feels that good, you tend to get carried away and keep gaining elevation.
But of course, whatever elevation you gain, you eventually have to come down. And this time, that meant descending on these long, narrow, strongly cambered skis.
The snow that day sank about 10?15 cm underfoot. In places it was firm and a bit scratchy.
In those conditions, the choice was obvious: descending in a zigzag using traverses and direction changes. The idea of linking continuous turns like on a groomed resort slope never even crossed my mind.
By the way, what exactly is the definition of a “traverse”?
In our terminology, when the skis move across the slope leaving two clean tracks, we call it a traverse. When the skis slide sideways while descending, we call it a side-slip traverse.
These skis are narrow, so they sink easily. And because they are long, their straight-line stability is excellent. In other words, they are very well suited to traversing. When the skis run on two clean tracks, they also pick up quite a bit of speed.
So the first step is observation.
Slip between that tree and the next one, then ride up onto that small rise and stop.
You decide your line first, then start moving. Repeat.
Descending a mountain slope like this, using the full width of the terrain, made me realize something: I don’t think I had ever used the mountain this widely before. Running straight across the slope builds speed, which makes it surprisingly thrilling.
If I had been on wider skis, I probably would have descended with side-slipping or with turns similar to that. And on gentle slopes the result might have felt like nothing more than “just skiing down.”
But these long, narrow rocket-like skis ー they’re fun in their own way.
…Anyway, the introduction got a bit long again. Now to the main point.
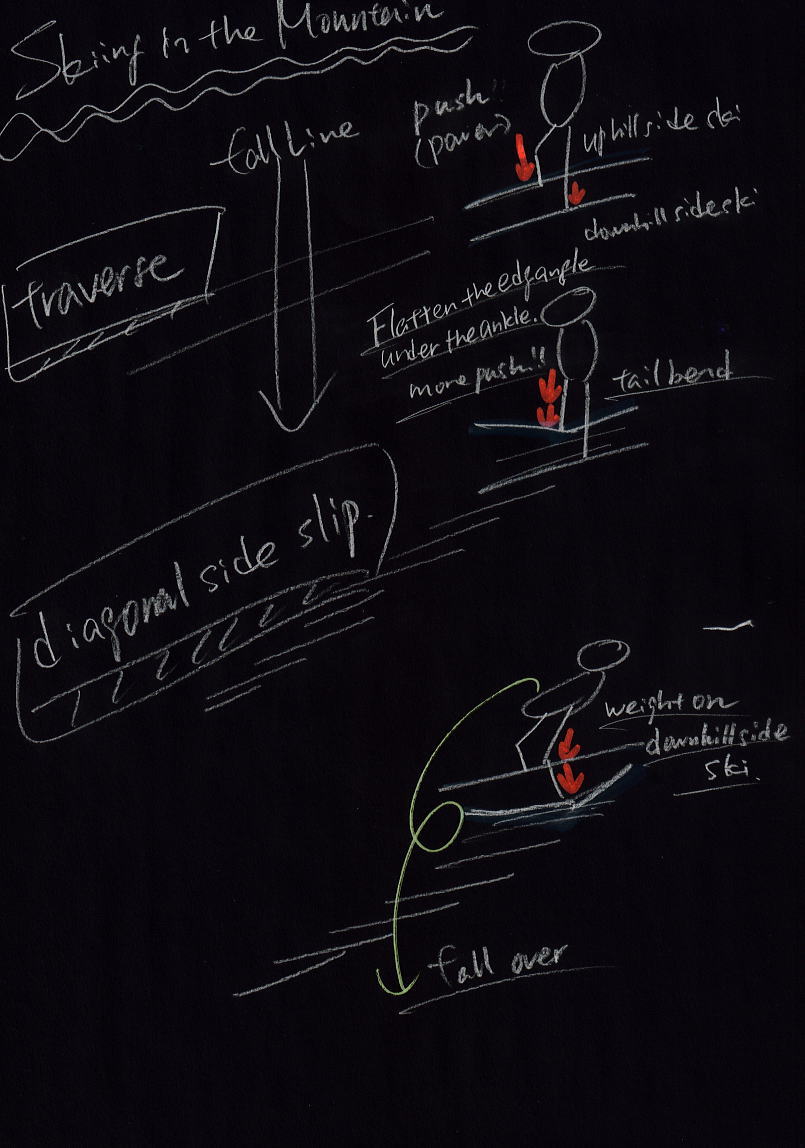
In our approach, both the traverse and the side-slip are controlled by the uphill ski.
The key focus is the outside of the ankle of the uphill foot. By extending
that leg and pressing the slope just slightly, the skis move straight ahead
ー which becomes a traverse.
If you want to move while side-slipping, you slightly flatten the edge with that same ankle, then extend the leg more strongly toward the fall line. The skis will then slip down toward the fall line.
With low-cut boots, the ankle has more range of motion, so you can emphasize pressure through the heel. This allows you to flex mainly the tail of the ski, making it easier to adjust the ski’s angle relative to the direction of travel. As a result, maneuverability improves significantly.
Reading about this might make you think, “What?”
But if you actually go into the trees with a NNNBC setup like this, it
quickly makes sense through experience.
Putting weight on the downhill ski ー or trying to stand on it ー simply
doesn’t help. In fact, it often leads to falling.
And traversing in a telemark stance, with the feet split front and back? That’s simply out of the question. Try it and you’ll see.
The problem is that on resort slopes, these exercises are often used as part of teaching people to turn. You see traverses and side-slips all the time.
But what is the goal? What are they actually trying to lead to?
And there are environments where those movements simply do not function.
At the very least, I think instructors should be aware of that.
That’s what an old instructor like me tends to think.
|