| JAPANESE → | ||
| 11/MAY/2026 update | ||
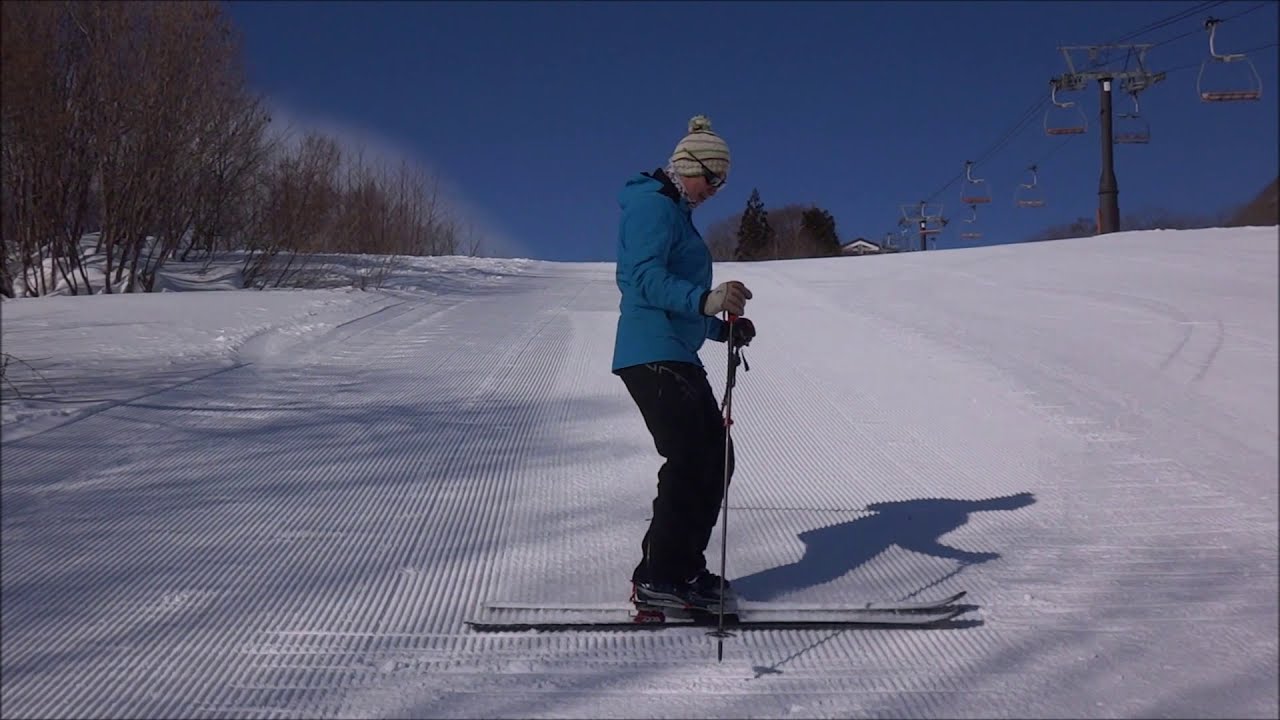
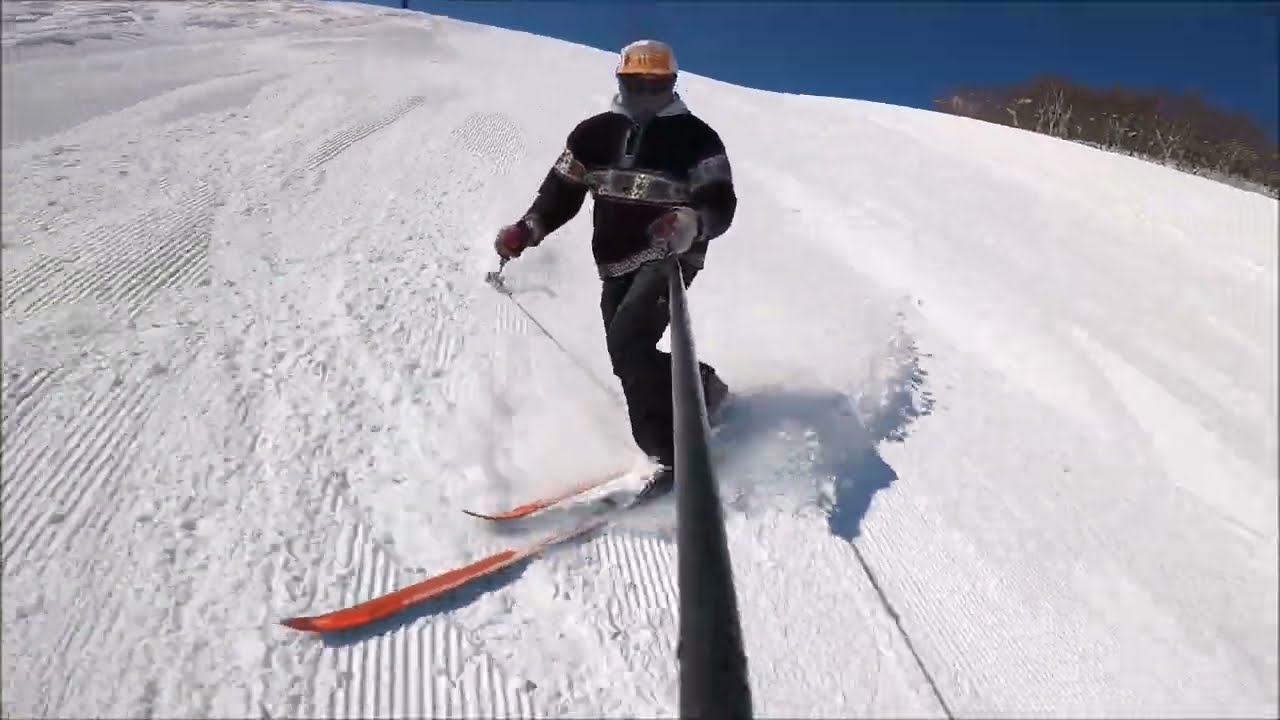
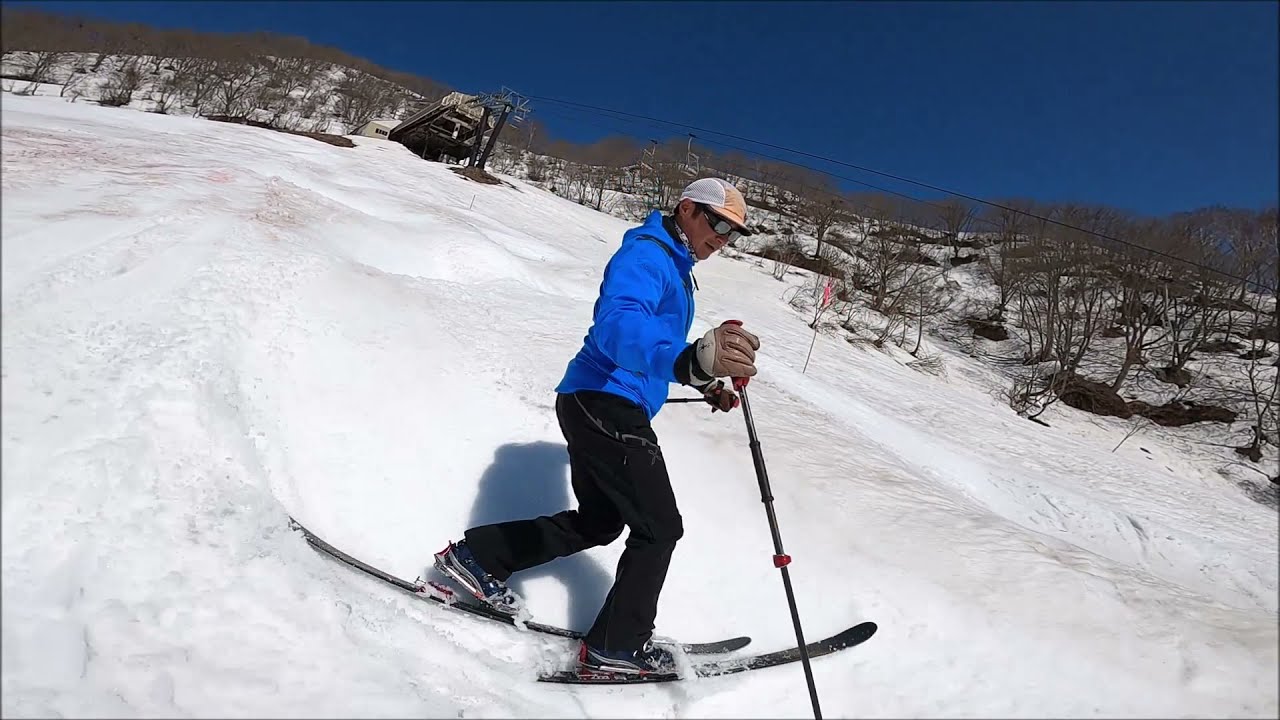
Skiing Well, Brainwaves, and HammocksI often take hammock breaks during ski tours. On the surface, it’s simply because it feels good. But actually, there’s more to it than that. In terms of brainwaves, it’s a transition space ー from beta waves into alpha waves, and sometimes even drifting toward theta. Beta waves are the brain state of tension and analysis. A beginner skier freezing up with thoughts like “Don’t fall!” or “What do I do next!?” is probably deep in that state. Alpha waves, on the other hand, are a state where you’re awake, but not over-tense. I often compare it to driving a car. When you’re casually flowing down the road, you’re not gripping the steering wheel with intense effort. Yet at the same time, your brain is processing surrounding cars, speed, following distance, road conditions ー all at incredible speed. In other words, high-level processing and muscular tension are not the same thing. There was a period in my life when I kept wondering, “What actually makes someone good at skiing?” Eventually I came to think that maybe the important thing was the ability to shift into an alpha-wave state. Back then, I even used one of those toy EEG devices and practiced entering alpha-wave states. People found it amusing to look at, but honestly, I think it was pointing at something pretty essential. In natural snow, trying to control everything usually backfires. Snow changes. Terrain changes. The harder you try to force control, the more your body falls behind, your vision narrows, and your connection with the skis disappears. But once you enter something like an alpha-wave state, the skiing strangely comes together. You see the landscape. You see the snow. The skis begin running naturally on their own. Rather than “making” a turn, the turn simply happens. People often say, “In the end, skiing is just about getting used to it.” But I sometimes think that “getting used to it” really means: “the amount of time it takes to become able to enter an alpha-wave state on snow.” If that’s true, then maybe learning how to enter that state is a shorter path than endlessly repeating technical drills. And this idea applies not only to skiing itself, but also to ski instruction. Personally, I think important things are better explained indoors, or at least in calm and comfortable places. When the body isn’t tense, but also isn’t sleepy ー that quietly open state, like when driving ー people seem much more able to truly absorb what they hear. Meanwhile, I often see ski lessons where students are lined up on a slope while the instructor talks endlessly. The students are enduring the cold, holding their edges, watching out for skiers and snowboarders coming downhill ー in other words, they’re already working hard just to remain there. Especially beginners. Simply standing on the slope is already consuming a huge amount of mental processing power. So when complicated explanations are delivered in that condition, I doubt much of it truly enters the body. I often find myself thinking it would make far more sense to separate “the place for understanding” from “the place for execution.” Anyway, I’ve gone off on another long tangent only loosely connected to ski touring.. But what I really wanted to say is simple: Whether skiing itself or taking a ski lesson, things seem to work much better when the brain enters an alpha-wave state ー something like the relaxed-but-highly-aware state of driving a car. After a hard stretch of skiing, I’ll often stop for a hammock break. And afterward, the next run sometimes changes completely. I’ve seen that happen many times. And honestly, those little brainwave TOYs may not be so silly after all. That said, hammocks still look a bit more natura... |
||
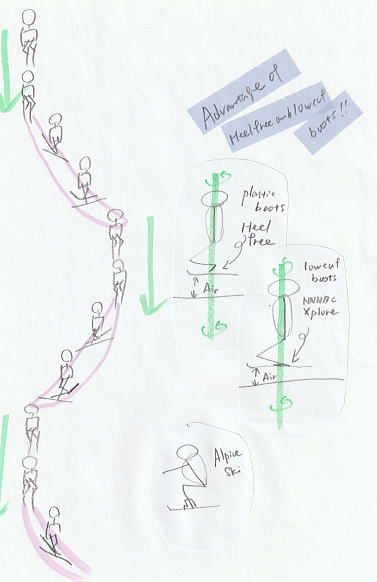
The Moment NTN Made SenseThe term “heel-free” has always carried a certain positive nuance. At the same time, it has often been criticized as unstable in downhill skiing. But there was something that kept bothering me. It was free, yesーbut not something that generated force. Re-examining NTN changed that completely. Why the second heel? It is a structure that converts the motion of lifting the heel into the energy that bends the ski. Lift the heel. Seen this way, even the feeling that “the heel doesn’t lift easily” takes on a different meaning. There is no longer any need to consciously try to bend the ski. What you need to do is simple. That motion becomes heel lift, and the structure of the boot and binding bends the ski. After that, all that is needed is inclination. NTN is a system whose structure converts heel lift directly into pressure on the ski. |
||
 |
||
|
The day after writing this, during an NTN lesson, I had a revelationーalmost like a bolt from the blue.What!? NTN is B-tele. It’s b-tele as it is.Whoa… this is insane… goosebumps… So, there are parts of the text that turned out to be incorrect, but I’ll leave them as they are as a valuable record of my thinking process. The relevant sections are marked in red. April 20, 2026 Evolution as “Stupidity”After trying various things, I realized that what I was doing is ultimately very simple: “Let go of the movements that NTN has taken away.” That’s really all there is to it. If equipment has evolved, it should be easier to use. From an instructor’s point of view, using more advanced gear should allow skiers to improve through simpler steps. That perspective is essential when building a method. If gear has evolved, then some of the old steps should be unnecessary. The improved parts should be left to the equipment. What the skier has to do should become simpler and more minimal. That, I believe, is what it means to accept the evolution of equipment. And yet, in reality, people still apply 75mm-era methods directly to NTN. They keep vertical movements, try to create fore?aft separation, and attempt to use ankle motion that no longer exists. In doing so, they make things more complicated than they need to be. When I removed all of that, the skiing became dramatically simpler. Turns just happened, almost effortlessly. To be blunt, it felt “stupid”ーbut in a good way. What’s happening here is a shift from “controlling” to “riding.” With 75mm or B-tele, you control movements to produce results. With NTN, you ride a system that already produces the result. Once you accept that difference, what you need to do becomes very limited. You can think of it as a turn machine. The skier is no longer an input device, but simply someone who stays balanced on top of the system. Just stay on it. That’s it. The key idea here is not to create things deliberately. Don’t create fore?aft separation. If you’re standing on the skis, it will happen naturally. Trying to force it only slows you down. What disappears is not movement itself, but intentional manipulation. What remains is extremely simple:
That’s all. That’s why it feels “stupid.” But at the same time, it’s highly reproducible. As for B-tele, it simply doesn’t fit NTNーalmost perfectly so. In a world where the ankle moves versus one where it doesn’t, the underlying assumptions are different. Trying to merge them only creates distortion. There is, of course, a limitation to this simplicity. On steep slopes, in rough terrain, or in deep snow, there are situations where you can’t just “wait.” The next step is figuring out what minimal additions are needed in those moments. Still, at this stage, the conclusion is very clear: NTN is a turn machine. You just ride it. Remove the unnecessary actions and accept the result. And when you ski that way, you can’t help but feel, “This is kind of
stupidーand I like it.” |
||
Heel-Free Equipment Was, in Fact, a Tool That Could Deconstruct the TurnAt ski school, this is how I explain it to my students. A turn is not a single movement. I succeeded in separating those two. This is a perspective I would never have discovered if I had only practiced alpine skiing. Within an alpine turn, direction change and braking coexist at the same time. “A turn exists to control speed.” Now I understand. The turning point came when I reexamined the fundamental nature of heel-free equipment. With heel-free gear, both feet can be positioned directly beneath the upper body. So I tried it. Direction change can be completed in an instant. If direction change is finished instantly, then the remaining time can be devoted entirely to braking. This is not merely a technical adjustment. That is why, within the industry, it amounts to a revolution. Those who stand firmly within existing theoretical frameworks may feel discomfort. But my intention is not to negate the past. Heel-free equipment was, in fact, a tool that could deconstruct the turn. And from that perspective, B-tele was woven into existence. |
||
We Just Want to Turn. That’s All.Once, I found myself linking Telemark skiing with the theory of evolution proposed by Charles Darwin. Darwin explained HOW living organisms evolved. Telemark skiing may share a similar structure. How do we stabilize the Telemark position? Most discussions focus on the HOW. But shouldn’t we be asking WHY instead? Why, in the first place, do we place our feet fore and aft? A common explanation goes like this: But does that really capture the essence? In a slippery environment, people instinctively try to keep their feet beneath their center of mass. And the sidecut argument itself assumes turning as a premise. In B-tele, for example, the essential element is not the turn but the brake. So let’s shift perspective. Perhaps those early cross-country skiers who skied fore and aft did not arrive there through stability theory. If so, the WHY behind the fore-aft difference becomes surprisingly simple: Because we want to turn. Not for stability. But from the desire to make a heel-free tool carve a turn. And if that is true, then it is wonderfully human- |
||
Between HOW and WHYCharles Darwin explained how species change. Telemark skiing feels the same to me. There is endless discussion about how to stabilize the stance, But why the lead change? Because of the telemark landing in ski jumping. These are explanations. For me, the lead change is not the goal. Twisting is braking. Untwisting is acceleration. When you ski in the mountains, Telemark skiing is the technique of expressing gravity without violence. |
||
The Turn You Can’t Cut LooseYou practice a turn on groomed slopes. So naturally, you want to take it into the mountains. That impulse makes perfect sense. But once you leave the resort, the mountain doesn’t cooperate. And this is the moment where the real decision happens. Most people don’t question the turn itself. Bad snow. Those explanations feel reasonable. Because questioning the turn means questioning something bigger. It means questioning the time, money, and effort already invested. At that point, defending the turn is no longer technical. You’re not protecting efficiency. So the narrative shifts. Telemark is really about mellow terrain. That’s not a conclusion. But the mountain doesn’t care how much you’ve invested. Some skiers accept that and adapt. Others don’t. They retreat-physically and mentally-back to terrain where the turn still
works. There’s nothing wrong with mellow skiing. Sometimes “I prefer mellow” really means The hardest part isn’t learning a new technique. Letting go of something that cost you a lot- The mountain exposes that difference mercilessly. And that’s why this moment matters. Because the skier who can say, For everyone else, the turn becomes a shelter. And for a few, |
||
| Once You See It as Performance, It Gets Easier. “In bad snow, I end up escaping into alpine turns.” When a guest says that, I can’t help but wonder what they are actually expecting from me. But to be honest, there is no technique that can guarantee that. So, as usual, I replied like this.
You’re not just making telemark turns. In bad snow, a judgment naturally kicks in: So you choose a better option. A safer option. Think back to when you first started telemark skiing. If someone told you back then that you were performing, they wouldn’t have been wrong. Over time, your body became accustomed to that performance. “Wow, I’ve improved.” But what exactly improved? What improved was the smoothness of the performance. People call that “being good at telemark turns.” That is a different category from being good at skiing itself. Once you realize that you’re performing telemark, In the backcountry, this judgment is critical. What deserves praise, in my view, is the decision that prioritized safety. You couldn’t make telemark turns in bad snow. Isn’t that perfectly fine? That’s not failure. And by now, some readers may have already noticed. In the B-tele curriculum, there is no such thing as an “acted telemark position” from the very beginning. None at all. And yet, the resulting skiing ends up looking like telemark turns. That’s the tricky part. I simply extracted the advantages of being heel-free That is my B-tele. And if it turns out that I label snow as “bad” less often than others, |
||
|
Staying One Beat Ahead of Thought A reaction follows a sequence. A reflex has no such order. In skiing, this difference shows up immediately. Many teaching systems focus on “correct form.” A reflex is not reproduction. When reflex is working, Because of this, the body does not lock up. Most ski control consists of subtle adjustments? Improving at skiing is not about making reflex faster. And something interesting happens when you start skiing this way. You remember how steep that pitch really was. On the other hand, Of course, satisfaction is personal. Still, I often think this: Riding the lift, |
||
Why Telemark Skiing Often Ends With “Oh, You’re Doing Telemark.”
|
||
|
Telemark Skiing as Cosplay Is Telemark skiing really about “expression” versus “physics”? Hmm… maybe. Picture this: a group of people skiing in purple Spider-Man suits. Now, skill aside, the main point is: they are Spider-Man. That’s what matters first. I’ve always thought that Telemark skiers are on the same stage. That stance, one foot forward, one back, trying to make turns?it’s an effortful movement, a form of expression. Telemark skiing is a form of expression. Style. Heck, you could even call it cosplay in a way. “Cosplay!?” Let’s recall the definition of cosplay: Now, what about Telemark skiing? And here’s the kicker: cosplay usually involves an imaginary character?something fictional. …Wait a second. Yes. Exactly. It’s not about physics. Even in the World Cup, if the Telemark stance isn’t performed, you get a penalty. One gate can add a whole second (imagine that in a race decided by 1/100 of a second!). So, Telemark skiing is performance. Once you accept that, everything becomes easier to understand. In backcountry, use proper AT skis. But on slopes or mellow terrain, Telemark is fun. Pick slopes and conditions that make the Telemark turn easy to perform. So yes, Telemark skiing can be seen as cosplay-just like Spider-Man. Good or bad at skiing? That, I think, is how people who also ski alpine perceive Telemark. P.S.1This “cosplay mode,” by the way, seems way more pronounced now with NTN bindings than back in the 30-year-old leather-boot era, through the plastic-boot stage. And speaking of physics, that’s B-tele. It’s the same physics of downhill heel-free skiing that hasn’t changed in 30 years. |
||
Refining Technique and the Harmony of “Emotionality”I refine technique. At the same time, there are moments that move the heart deeply. The process begins indoors, with a classroom session in front of a whiteboard. Refined technique quietly, yet surely, opens the path to emotionality. Ultimately, what people seek as “emotionality” lies at the intersection of technique and harmony. |
||
The “Emo” of Turns and the Aesthetics of SufficiencyThere is a certain charm in skiing turns that words can hardly capture. Emo, in this sense, is that moment when the forces of nature and your body resonate unexpectedly. Yet on the slopes, I often see “overdone turns.” Japanese has the concept of hitsuyo jubun (“necessary and sufficient”) The prevalence of excessive turns comes from the artificiality of groomed slopes. But in the mountains or backcountry, the situation changes completely. The core of emo lies in this harmony. Ultimately, the allure of a turn comes down to this. That is what I call “emo.” |
||
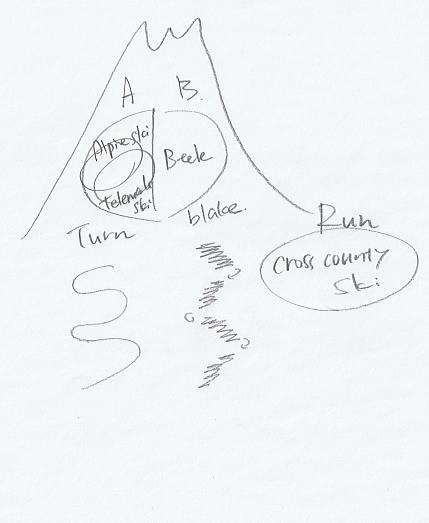
Introduction to Light SkiingWell… One question I often get is: Here’s what I say: Yes, for me, the value of heel-free skiing is above all “being able to walk.” To repeat: the primary reason I’ve continued Telemark skiing for 30 years is because it’s heel-free. Naturally, if you prioritize ease of walking, leather boots win out over plastic boots. Lighter skis and boots are also preferable for walking compared to heavier gear. Downhill skiing can be fully managed with the necessary skills, anyway. The gear I often use includes:
All of these are paired with light skis with step-cut bases. With this setup, you can start walking easily and ski back quickly. I love the moments from pre-dawn to morning when the sky’s colors change, and sunsets are equally spectacular. During the day, I often find myself walking through forests. I call this combination of ease and lightweight gear “Light Skiing.” Currently, NNN BC, XPLORE, and 3-pin soft leather boots fall into this category. This is my favorite and strongest area in heel-free skiing. ■ School ProgramsOur ski school offers two Light Ski programs: ● Light Ski DownhillFocused on downhill skiing techniques. ● Light Ski HikingA hands-on program where you walk into the backcountry and ski back. If you want to refine your skiing technique, the first is ideal. If you want to experience the whole picture, the second is perfect. ■ “Is Telemark skiing part of Light Skiing?”I’m often asked this, and the answer is “No.” In my own definition, Thirty years ago, Telemark skis were long and narrow, used with leather boots. Today, they have evolved into the NTN system. Telemark skiing didn’t start as a way to walk heel-free?it started as a way to enjoy the Telemark stance and turns on the slopes. That’s the evolution I see. For downhill-focused Telemark skiing, our school offers a program called “B-tele”. For those interested, we also have “A-tele.” Details are explained on another page. It’s a long story, but―― Naturally, if you start with Light Skiing, you can come to appreciate Telemark skiing positively: “Ah, this is well-designed gear.” If you’re going to step into the world of heel-free skiing, |
||
The World of Heel-Free Skiing and the Adventure of Changing the SignboardLately, I’ve been thinking a lot about how I’ve defined Telemark skiing for myself. But you know, downhill skiing inevitably leans toward being… macho. Power, speed, competition, carving… can’t avoid it. So if Telemark skiing has evolved in that direction, then being somewhat macho is inevitable. Just look at YouTube. Tons of people skiing Telemark with all their effort. Makes sense, right? That brings up the question: how do I reconcile this with my long emphasis on “softness,” “agility,” and “quietness”? Time to sort it out?a concern that’s been on my mind for several years now. Alpine is Macho, BC is Soft-TouchSo, what about the sign that says “Telemark Ski School”? Does it still fit? But when I head into quiet, empty mountains?BC?it’s heel-free skiing all the way. Sometimes Telemark, sometimes BC crosscountry ski, sometimes XPLORE. Walking itself is part of the enjoyment, so even if skiing is a bit challenging, I usually choose soft boots for easier walking. Well, I’m good at skiing too (laughs). And here’s my rule: no macho behavior in BC. Violence is out. Japan’s winter forests, soft snow… that air naturally makes you gentle and calm. Quiet, soft-touch movements are a perfect fit for heel-free skiing. Telemark too. Naming and the SignboardNow, the tricky part?naming. Honestly, I’d love to call the 75mm standard “Telemark” and NTN “Macho Telemark.” But that’s probably too much (laughs). Looking at the market, NTN is already considered “Telemark,” while 3-pin and T4 are grouped in the same “Nordic Touring” category as XPLORE and BC crosscountry ski on online stores. Makes sense. My Mahoroba Club has probably already become a “Nordic Touring Ski School.” That’s where my expertise lies. After 30 years of running a “Telemark Ski School,” maybe it’s time for a new sign. Take it down, and I’m freed from the “curse of the Telemark turn.” After all, the skiing I show in videos?is it really Telemark turns? Thirty years as an instructor, I say “No,” and call it “B-tele.”1): How about “Nordic Mahoroba Club”? Thinking about all this… I can’t help but feel a little excited. 1)B-tele: Customers who installed B-tele from the start never utter words essential to the traditional Telemark skiing method-“front foot,” “back foot,” “Telemark position,” “weight on” or “riding.” Experimentally verified. Simply put, they can ski without needing such ideas at all. |
||
"B-tele" ? Skiing That Isn’t a TurnYou place your skis across the fall line and press the edges against the snow to create resistance. But what about when the snow is deep? There are three key points to keep in mind. First, braking is done mainly with the uphill ski-the inside ski. Second, it’s about how you use the joints in your uphill leg. Third, you mainly use the tail of the uphill ski. I think it’s fairly straightforward. That’s why my skiing can be fully copied by anyone. That is my skiing-telehiro’s skiing. Skiing that isn’t a turn. |
||
 |
||
The Blade Called SkiFor the past couple of weeks, I’ve been doing something unusual for me ? a part-time job cutting kaya, the tall grass used for thatched roofs. Cut → Gather → Stand. It’s hard work. That’s the honest truth. It’s tough, but I don’t hate it. So I stop for a moment and think: Perhaps it’s the simple satisfaction of seeing progress ? the field gradually opening up before my eyes. It’s the same feeling I get when shoveling snow in midwinter. Maybe that’s it. But no, I think it’s something else. I sharpen the edge every time I take a break, and that moment when it slices cleanly again ? that’s the best part. That’s the world I enjoy maybe that’s why I keep going, even while rubbing my aching back. The same thing can be said about skiing. “Pulling” that’s where free-heel skiing truly shines. Yes, ski is a blade. |
||
A Perspective on “Leaving Telemark Behind”― How XPLORE and NNNBC Show a New Form of Heel-Free Skiing ―A ski shop staff stopped by, and we had a brief conversation about sales. Perhaps it’s because the set I took to Tateyama the other day was still sitting by my entrance. That said, the conclusion is actually very simple. As for Telemark skiing itself, once boots became plastic, the focus naturally shifted toward downhill skiing. On the other hand, leather boots before that were designed for walking. Furthermore, NNNBC and XPLORE are not called “Telemark skis” by name. Now, Telemark skiing itself isn’t bad. I hope my YouTube videos might provide some hints or insights along these lines. |
||
Why and How ? The “Why” and “How” of Telemark Skiing“Why?” and “How?” But how did the very first life originate? Or why did it originate at all? Now, let’s bring the story back to skiing?chaotic telemark skiing. Suppose you enroll in a ski school. What do you do there? However, students also want to ask: So how would an instructor answer this initial question? Example 1: “Telemark skis are unstable because, unlike alpine, the heel is free. That’s why you put your feet fore and aft, lower your center of gravity, and try to stabilize yourself. This is the Telemark position!” Hmm… Now, refining a Telemark turn that incorporates the Telemark position?that’s the ski school’s specialty. By the way, I’ve been a Telemark ski instructor for 25 years. How would I answer this “Why”? Q: Why do we need the Telemark position? Q: Is Telemark unstable? Q: So, in the end? |
||
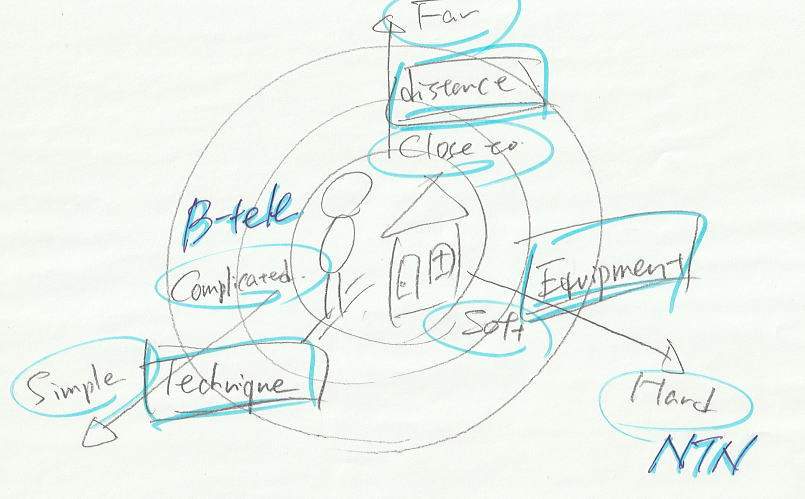
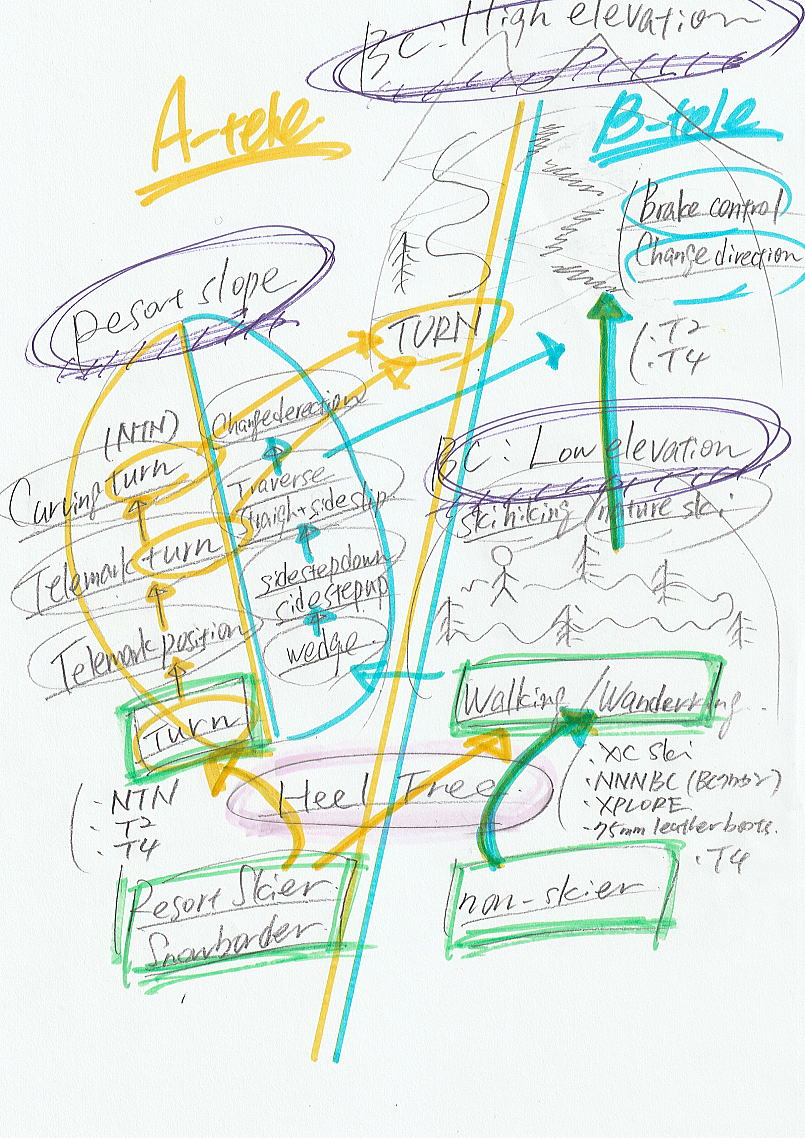
Definition of the Telemark TurnAt our ski school (Mahoroba Club), we have, for reference, put the Telemark turn into words. Here it is: A Telemark turn is the act of expressing, or attempting to express, a mastered Telemark position during the course of a turn. The "Telemark position" refers to a stance with one foot forward, one foot back, hips lowered, and the heel of the back foot lifted off the ski. In short, In other words, a Telemark turn is an expression. The quality of this expression is what is evaluated and graded in a "technical examination." In my view, this is the process of the technical examinations conducted by TAJ (Telemark Ski Association of JAPAN). However, TAJ itself does not have a definition of "Telemark turn." The fact that this can exist as it does is something that those promoting Telemark skiing, whether at the association or elsewhere, should reflect upon. As a side note, all of the above would be categorized at our ski school as "A-tele," and we distinguish it from "B-tele." B-tele is not an expression but practical technique. Since it is a skill, anyone can achieve it. |
||
 |
||
“Telemark Skiing ? Is It Really a Sport?”Let’s start by asking a simple question: what is a sport, really? Now, looking back at the world of telemark skiing ? in the leather-boot days some 30 years ago ? it wasn’t really a “sport” in that sense. But over time, things changed. As a result, the NTN system came to embody precision, speed, and competitiveness ? a kind of macho setup. So when the veterans say, “That’s not telemark,” it’s actually quite natural. Seen this way, those nostalgic voices aren’t just about the past. As for me, I’d say the telemark I fell in love with wasn’t really a sport at all. That’s the telemark I enjoy today ? the one that stands a little apart from sport. If I want sport, I’ll just go alpine skiing at the resort. |
||
 |
||
Two Worlds of Heel-Free SkiingAbout 30 years ago, telemark skiing was all about leather boots. Coming from an alpine skiing background, I was struck by the lightness of having a free heel, Of course, you couldn’t just walk backward on a groomed slope. Sometimes we climbed with skins, sometimes we walked using step-cut skis (scaled skis). At that time, in my circle, telemark skiing was seen as a tool for those who went into the mountains. By the 2000s, plastic boots became common. Today, with the introduction of the NTN system, the gear is almost indistinguishable from alpine skis. With NTN, the impression is: “Can I really walk in this? No, this muscular setup is meant for downhill?it’s really for the slopes.” And now, those who are starting telemark skiing naturally choose NTN, following market trends. But here’s the question I keep asking myself: Thirty years ago, we were thrilled by the idea that we could walk on skis, If modern telemark skiing, while heel-free, becomes specialized for downhill, that’s fine. At the same time, the world that values lightness and the freedom to walk could be reborn with a new identity. Recently, systems like XPLORE have emerged, following the same principle. In short:
|
||
|
||
|
||
|
When I look back at my old YouTube videos, I can really see how my skiing style has changed over time. The clips I shared are from about 15-16 years ago, around 2010. Back then, I was aiming for what I called a kind of “powerless carving turn” made possible only with a free heel. It’s obvious when you watch. There’s none of the typical “up-and-down” movement you see in alpine skiing?no rhythm coming from flexing and extending. I’m just sliding smoothly down through uneven terrain, and you can see the outside ski tracing a clean arc. At the time, I often talked about the “X-axis and Y-axis.”
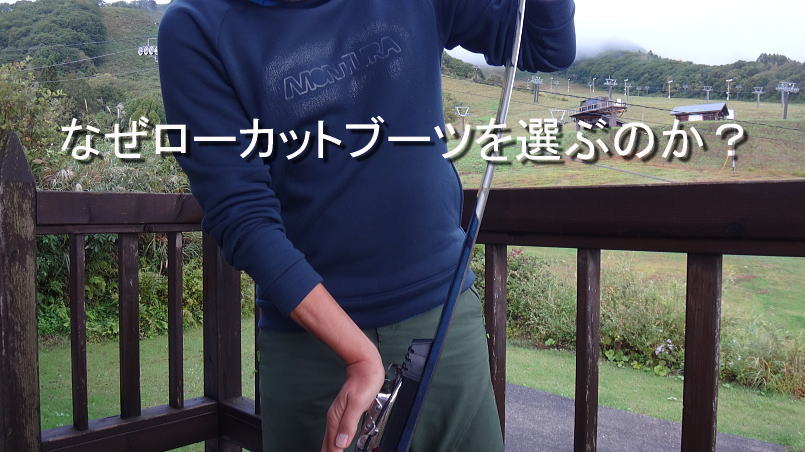
With free heels, though, your heel is released, so stepping forward becomes an X-axis move. Think of it like this: chopping straight down on a cutting board is the Y-axis, while slicing sashimi by pulling the knife is the X-axis. Both work together, but with free heels you can actually make the X-axis the main focus. In those videos, the outside ski’s arc wasn’t something I was consciously steering. It was almost “automatic.” The real driver was the inside ski. If you slow down the last part of the video, you’ll see it: at the end of the turn, the outside ski ankle is extended. Then it contracts, while the inside ski rotates first. That movement pulls the outside ski into a smooth arc. And here’s the key: the big toe edge of the outside foot stays in contact the whole time?it never lifts. That’s why the ski draws such a clean curve, both into the fall line and back out of it. Honestly, alpine skis just can’t do that. Hehehe. Why? Because in alpine skiing, the outside ski ankle never actually extends at the end of the turn. That’s the crucial point. That’s exactly why I wear low-cut boots. Ha-ha. |
||
 |
||
 |
||
 |
||
|
||
|
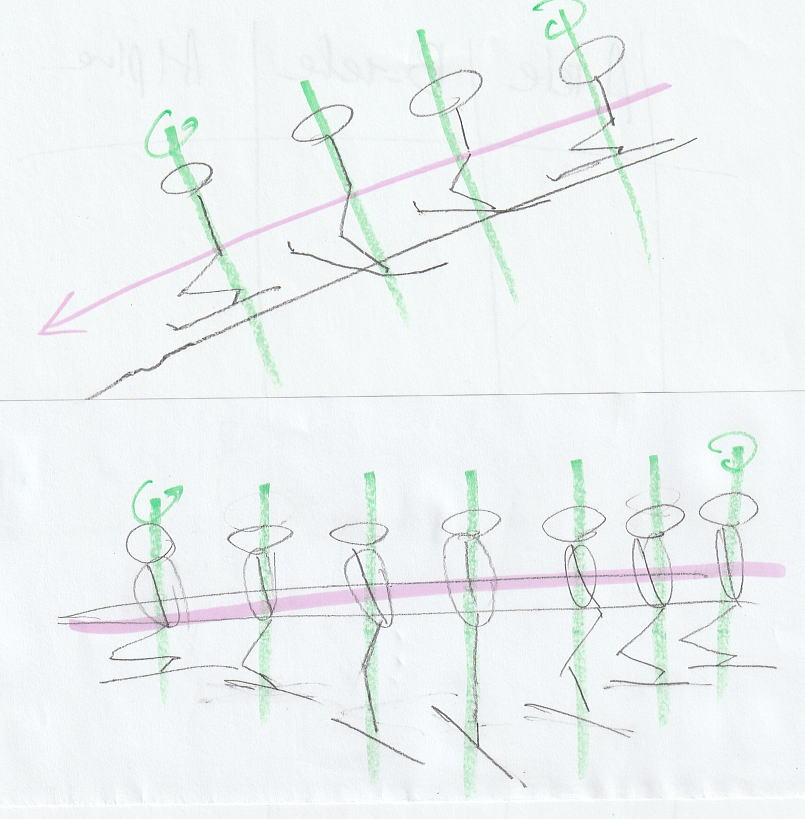
The video focuses on skidding. The skis are positioned perpendicular to the fall line, and from this position, sliding down along the fall line is called “sideways skidding,” while moving diagonally is called “diagonal skidding.” Let’s clarify the terminology first. On the slope, start with the skis sideways to the fall line and the body upright. The legs are positioned on the uphill and downhill sides, with the uphill leg usually more flexed. The edge angle of the uphill ski is relaxed and lightly pushed in the desired direction. Here, “pushing” does not mean putting body weight on the ski?it refers to extending the flexed leg. Since the uphill leg is already flexed, it can be extended. Relax the edge and push in the chosen direction, which can be along the fall line, forward, or backward. The orientation of the body or gaze does not matter. This sideways skidding is a braking element, performed on groomed or firm snow, where the skier adjusts the braking force while skidding. To illustrate the subtleties of this pushing motion, I often use the analogy of spreading cream on a cake (“napper”) on a rotating stand with a stainless steel spatula?the spatula represents the ski. The delicate pressure and angle are what give the sense of skidding. It’s not a brute-force action. In short, skidding primarily uses the outside edge of the uphill ski, leaning it and pushing, not standing on it. Imagine spreading cream on a cake. At the beginning of the video, both alpine and telemark stances demonstrate skidding. Both share the visual appearance of the body being bent, with weight on the downhill ski. This is perhaps the most common form. In contrast, with B-tele skidding, the body remains upright because the uphill leg is being extended. This upright body posture leads to the later elements of twisting, untwisting, and the rotation axis. In the latter part, the video shows turning (spinning) from skidding in both alpine and telemark stances. Compared to the alpine stance, the telemark stance twists the whole body more strongly relative to the fall line. As a result, the energy released during the untwisting produces stronger force, allowing the skis to spin faster. Although either stance can achieve the spin, the telemark stance is preferred to generate greater twisting and untwisting power, enabling the skis to spin more than 90 degrees almost automatically. This is an advantage of heel-free or low-cut boots. The next step is the moment when the body “snaps” from being extended during skidding to a slightly contracted stance. This characteristic posture is called the B-tele icon stance. The icon stance occurs the instant the body contracts after being extended, with the following features:
An analogy is lying on your back with knees bent; the back, hips, and feet are aligned on a straight line. This straight line becomes the rotation axis. The twisting energy accumulated in the telemark stance during skidding is released by contracting in the icon stance, generating powerful untwisting force. With the rotation axis straight, the skis spin nearly in place. Furthermore, since the movement is a contraction rather than a squat, the skis momentarily lift off the snow, accelerating the spin. The continuous B-tele turn combines the pushing/extension during skidding (braking element), the contracted icon stance (acceleration element), the extension twist and contraction untwist, and the straight rotation axis. This sequence of braking, acceleration, twisting, and untwisting is what the video demonstrates. |
||
 |
||
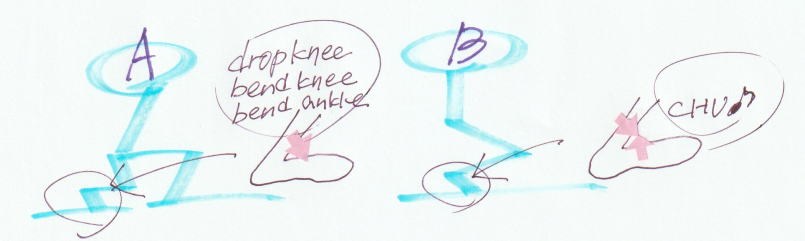
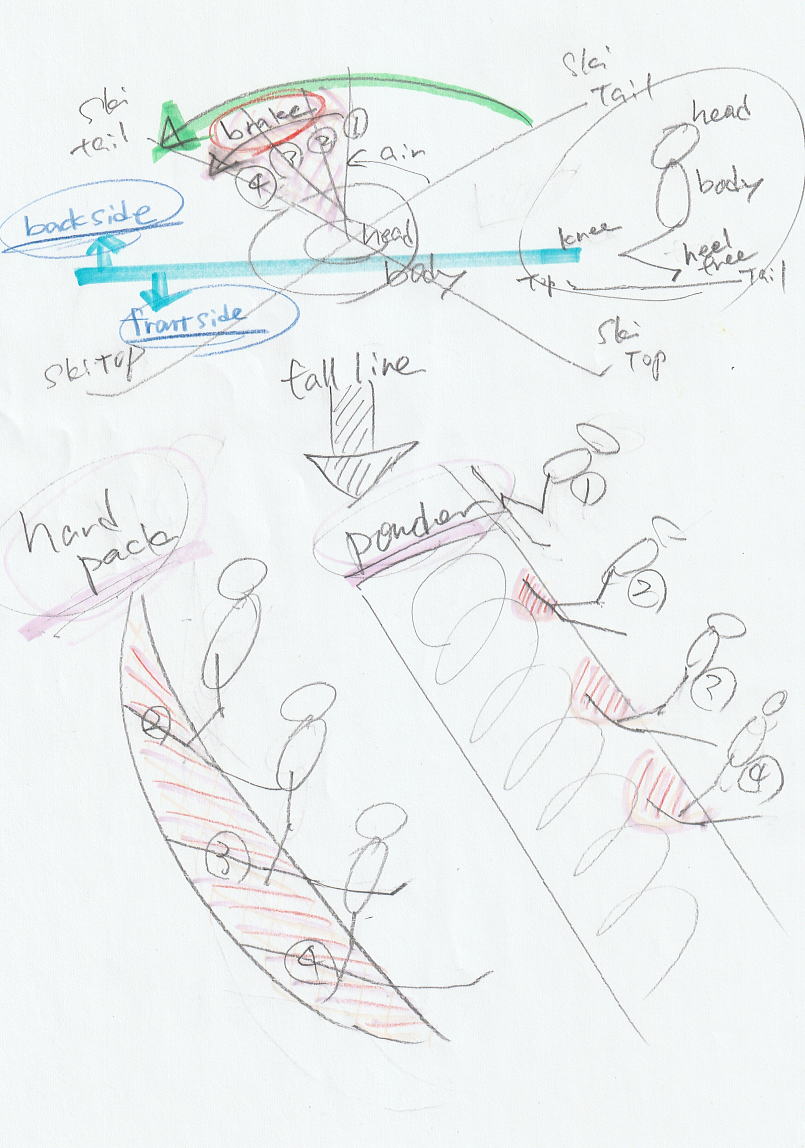
B-tele Icon Stance ExplanationThe B-tele icon stance represents the posture in which the body (and legs), previously extended during skidding, has been compressed and returned to a neutral position. Visual characteristics:
Functional principle:
Body sensation / imagery:
Summary:
|
||

|
||
|
Have you ever taken a video of your own skiing and really studied it?The truth is, while we’re skiing, very few of us can actually see what our skis are doing. I’m the same?most of the time my skis aren’t in my field of vision, so I’m really operating based on feel and imagination. Let me share a recent insight I gained from filming myself. I was skiing NTN bindings with step-in plates, in slightly sticky snow. Right after starting, my inside ski (the rear ski in Telemark) began to wobble, and after a few turns it actually popped off. While skiing, all I noticed was a strange feeling?“something’s off.” But watching the video, I could clearly see what was happening. Here’s the key point: my control comes from using the inside ski’s tail as a brake. On hardpack, that means smearing; in powder, it means burying the tail. The action is the same. I move the tail through a sequence?1 → 2 → 3 → 4?and that movement leaves its trace as a turn, a line in the snow. Now, with low-cut boots, this movement is smooth and natural. But with NTN, the point of leverage shifts, making it harder to execute. That’s why my inside ski became unstable. In other words, much of my braking happens behind me, at the tail of the inside ski. It’s almost like applying the brakes from the backside?an unusual but fascinating perspective. And I would never have understood it without the video. April 8, 2025 |
||
|
||
 |
||
 |
||
|
||
|
In alpine skiing, we often use the terms short turns and long turns. For Japanese skiers and instructors, these expressions feel completely natural. “Let’s try some short turns next.” “Now let’s make some big, round turns.” In other words, in alpine skiing, the skier consciously chooses the turn size. So, how about Telemark? Saying “Let’s make short Telemark turns” or “Let’s try long Telemark turns” also works, of course. But in the video I’m showing here, what I’m doing is B-tele. By appearance alone, you could classify it as short turns. But here’s the important part: I’m not actually intending to make them short. They’re almost automatic, or passive. On a steep slope, if you just let gravity do its work and apply braking alternately left and right, the rhythm naturally becomes short-turn-like. So why do the skis snap around so quickly?It comes down to two things: braking and the rotation axis. With a free heel?especially in a low-cut boot?you can keep that axis straight. Combine that with stored energy and a bit of torsion, and the skis will turn quickly and smoothly. To summarize:
When you think of it that way, isn’t Telemark an incredibly useful tool on steep slopes? |
||
|
||
|
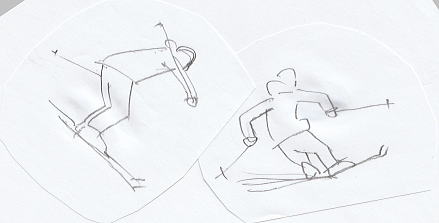
Let me explain some key points about my skiing style. Now, think of the typical silhouette we often see: shoulders forward, face forward, arms reaching out. You’ve seen that before, right? It shows up in both alpine and Telemark skiing, especially when someone is working hard to make a turn. So why does this happen? And why do the hips move backward in the first place? Now, why do skiers compress in that way? In my video, though, you’ll notice that I also get smaller at times?for example, riding over a roller at the start. But notice: my shoulders don’t push forward, my arms don’t move, and my upper body stays upright. Why? Let’s summarize:
The pressure that bends the skis is managed by extending the joints. That’s B-tele. Which approach you prefer is up to you. |
||
 |
||
 |
||
|
||
| Why telemark? Because I want to walk away to quiet places. To do that I have to be heel-free. It's not for climbing or skiing down. It's because I want to get away from people and enjoy the quiet nature. The beauty and quietness of the Japanese snow forests right next to me. | ||
|
Everyone, I want to share a memorable lesson I learned when I earned my cross-country ski instructor certification in New Zealand, from a Norwegian instructor. “Walk on your ski, not on snow.” Think about it. On hard asphalt, even if you’re a little tipsy, you can walk, right? Walking on hard ground with sneakers is essentially the same as walking on the hard surface of a ski with a flexible classic boot. Isn’t that a brilliant idea? In daily life, we sense “hard” or “soft” through our soles. That’s exactly why cross-country skis have bindings. No matter how far you walk, the boot sole is always on a hard ski surface. You can feel the firmness underfoot, so walking feels natural?just like in everyday life. You can enjoy the scenery, chat with your neighbor, and still move comfortably. In Japan, we often hear, “Equipment is part of your body.” In that case, the boundary we think about is usually between the ski and the snow. But the Norwegian instructor taught me a different perspective: the boundary is between your boot sole and the ski (or binding). This is a view shaped by a long history of using skis as a means of transportation. I felt it deeply?it really touched my heart. |
||
|
||
|
Everyone, today let’s think about speed control. Now, what about downhill skiing?
That’s right, everyone. Speeding up is also part of brake control. You’re not producing extra power; you’re controlling your speed by adjusting how and when you release the brake. So when people say, “Speed control is crucial in downhill skiing,” it really means the same thing as how well you can use the brake. Try this in your practice: pay attention to the brake not only when slowing down, but also when speeding up. You’ll notice your skiing becomes much more stable. This is why I always say, “Skiing is all about the brake!” |
||
|
Everyone, today let’s think about the question: “What is a Telemark turn?” My answer is this: “It’s a mark that shows you belong to the same tribe, or like a tattoo.” A bit of a funny expression, isn’t it? Let me explain what I mean. Now, here’s an important point: It’s hard to shake the assumption that “a Telemark turn is natural just because you have heel-free equipment.” That’s why I described it as a “tattoo.” And you can also think of it as “a formal practice or etiquette.” A Telemark turn is an intentional movement. It’s not something that appears spontaneously, like a child simply trying it for the first time. That’s why the word “practice” fits perfectly here. Skill level is just part of the etiquette. Another interesting thing: people who ski Telemark naturally notice others doing Telemark turns. “Ah, a Telemarker!” In my case, that feeling brings joy. Lucky! Positive emotions! On the other hand, when I see someone using Telemark gear but only doing alpine turns, I feel a little sad, a bit disappointed. But it’s not about skill. The root of that emotion is, “They’re in the same tribe, but…” I understand it well, having spent many years in A-tele myself. Next time, we’ll discuss: “Is B-tele a Telemark turn?” Stay tuned… maybe! |
||
|
Good morning, everyone. Today, I was out for my morning jog thinking about a question: “What is Telemark skiing?” I’ve always liked thinking about something while walking or cycling, even as a kid (Anne of Green Gables, anyone?). It feels more constructive?and somehow slimming?than just sitting in a chair pondering. So, how would we explain Telemark skiing? Let’s organize it in this order:
Summarizing all that, here’s my conclusion: “It’s a heel-free genre that evolved toward downhill skiing?and today, it has reached the NTN system.” Pretty neat, right? Maybe jogging helps clear your mind! The pattern is: start with a concise statement, then expand with explanation. Now, what do I mean by the “heel-free genre”? When I started Telemark, it was leather boots. Then plastic boots, 75mm standard, and now the NTN system. Looking back over 30 years of changes, I’d say: “It was a straight path toward more rigid gear.” However, for someone starting Telemark today, this is their first experience. They don’t have the sense of “it’s gotten harder.” Telemark skiing happens on the same slopes as alpine skiing?downhill skiing, Telemark style. Incidentally, if you check the Rottefella website from a few years ago, 3-pin bindings no longer appear on the Telemark page?they’ve been moved to backcountry. BC X-C, XPLORE, and 3-pin are now backcountry. NTN is Telemark. Seeing this, I sometimes wonder: “Are we really running a proper Telemark ski school?” or “Should we rethink the sign that says ‘Easy Telemark’?” That’s the kind of reflective mood I’m in these days. If all goes well, next time we’ll continue with: “What is a Telemark turn?” (Fingers crossed!) |
||
 |
||
|
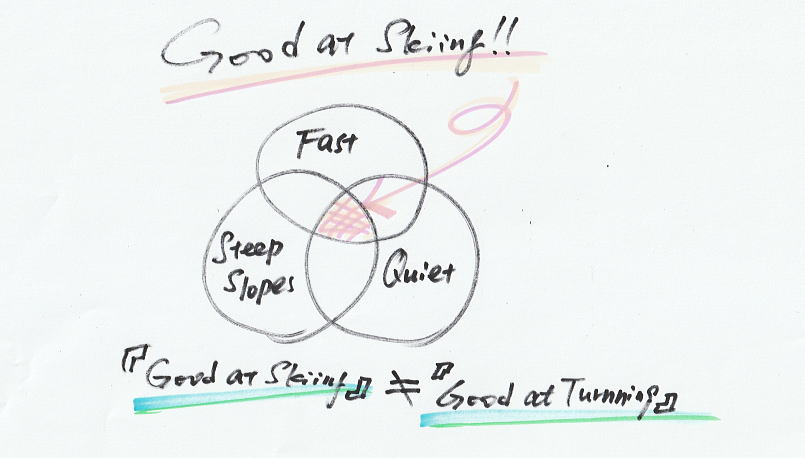
Everyone, today let’s think about what it really means to be “good at skiing.” For me, I focus on three main points:
If someone meets all three of these criteria, I consider them good at skiing. Interestingly, turning isn’t included in these criteria. And the same goes for Telemark skiing. Of course, this is just my personal standard, but it can be fun to think about your own definition of what it means to be “good” at skiing. |
||
 |
||
|
Everyone, many people think that skiing is all about drawing continuous turn arcs. In fact, skiing is a combination of braking and turning. Let’s start with braking.
Both use mainly the inside ski’s outside edge, and especially the back half of the ski. Next, let’s talk about turning. There are three types:
Note: The aerial spin is possible thanks to heel-free systems or low-cut boots. You cannot do this with alpine skis?even small turns remain turn-arcs. To summarize, here’s what you should practice:
Master these, and you’ll be able to ski not only on the slopes but also down mountain ridges?regardless of snow conditions. |
||
|
About B-tele It’s always me skiing?whether in a video from over 10 years ago or in yesterday’s clip?but what I focus on or challenge myself with changes over time. That way, when you look back, you can see it as a record of evolution. When talking about B-tele, please refer mainly to the more recent videos. Above all, I believe the illustrations are the clearest guide. |
||
|
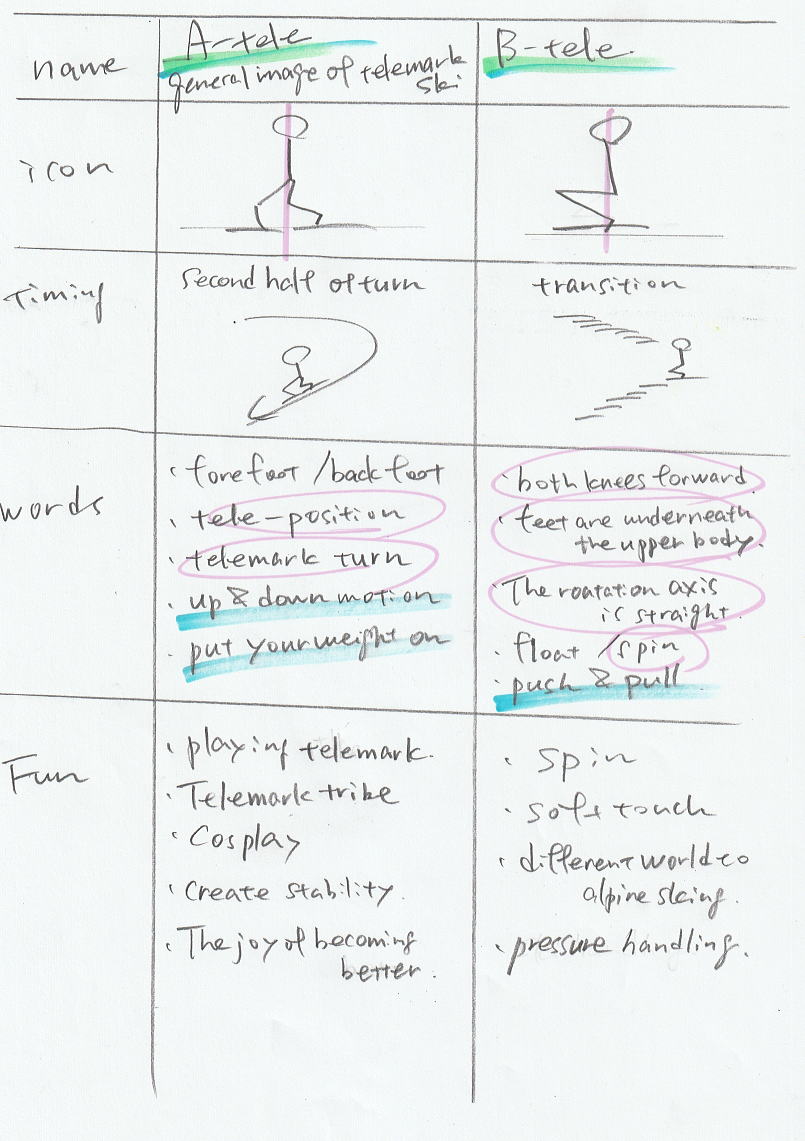
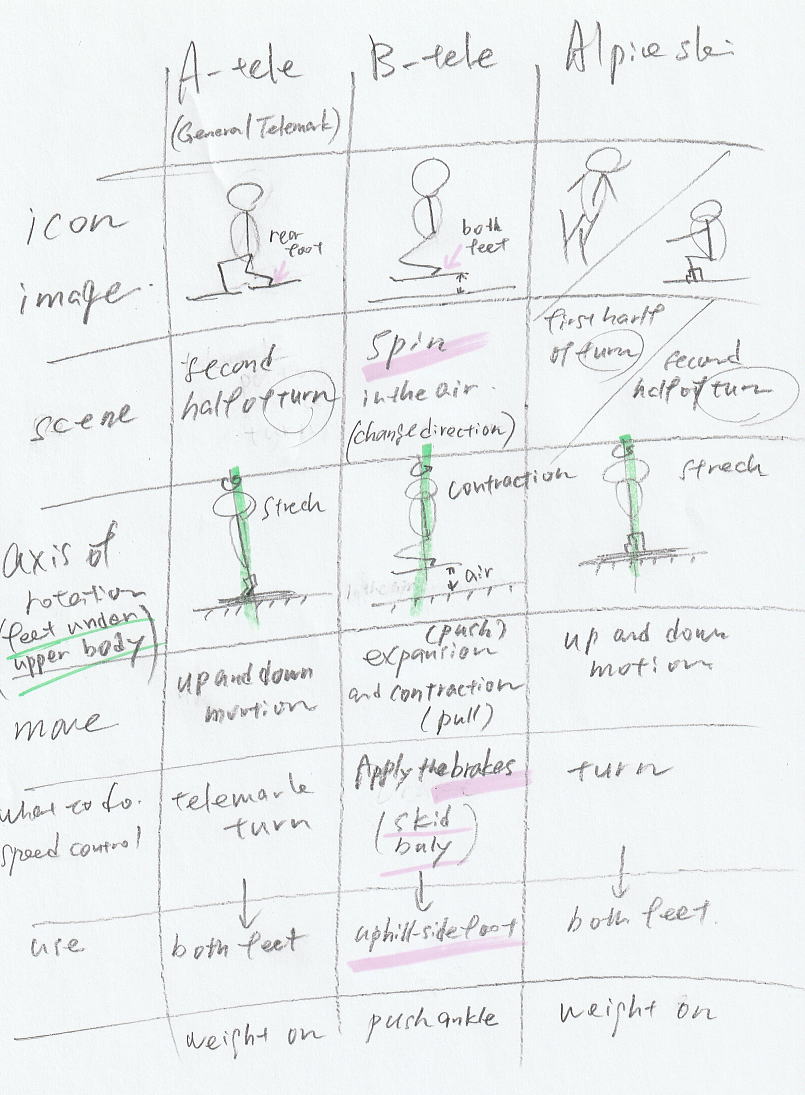
Everyone, today let’s talk about the differences between A-tele and B-tele. First, let’s look at the basic approach:
In A-tele, braking is included in the turn itself. How you enter the turn also differs:
This also affects the turn radius:
And the slope steepness?
How you apply pressure to the skis is different as well:
Up to this point, these concepts apply to both alpine and Telemark skiing. Now, specifically for Telemark:
The “showpiece” of each style is different:
However, when skiing in complex mountain conditions, I personally stick with B-tele mode?it’s safer, more stable, and makes full use of the gear’s advantages. |
||
 |
||
|
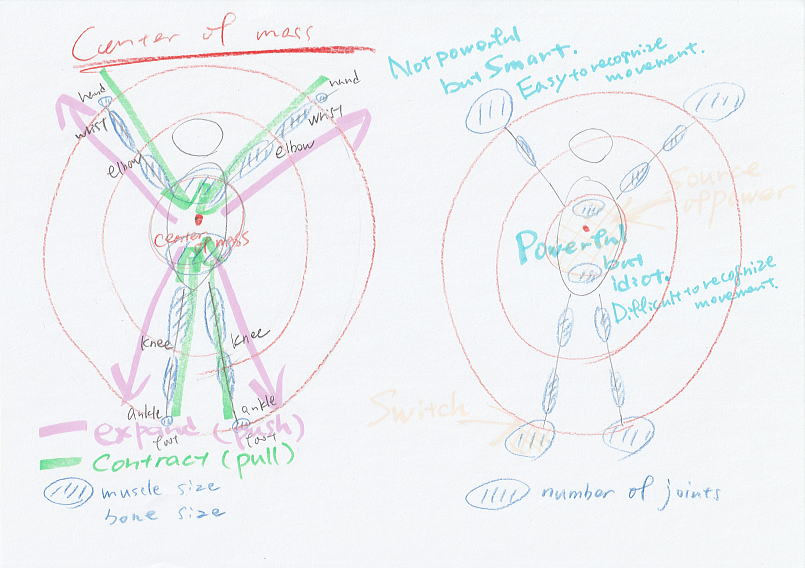
Alright everyone, today we’re going to talk about how to generate power in skiing using your body. Let’s start with the center of mass?but not the center of gravity. Here, I mean the center of the skeleton. From this center of mass, joints at the same distance tend to move in paired patterns. Imagine this:
For example, bending both your elbows and knees at the same time is easy. But bending your elbows while extending your knees? That creates a slight moment of hesitation. Also, the closer a bone is to the center of mass, the bigger and stronger it is; the further away, the smaller and more intricate. Same with muscles and tendons. Now, here’s the key point:
Can you picture it? Now let’s go a step further. When improving your skiing, many people focus on hip or shoulder alignment. But honestly, this isn’t the most effective. Why? Because hips and shoulders are “dumb”?they’re hard to move precisely on command. Even if an instructor tells you, you can’t instantly fix it. Hands and feet, on the other hand? Simple. “Raise your index finger”?everyone does it immediately and correctly. That’s what I mean by smart, responsive parts of the body. Here’s the conclusion: Downhill skiing requires big power. That power comes from the center of the body. The trick is this: use your hands and feet as the “switches” or “dials” for output. This is my B-tele concept. |
||
 |
||
|
||
|
||
|
||
|
Everyone, let’s think about this for a moment. Telemark skiers often seem not very comfortable talking about technique, right? So, what is the goal for someone starting Telemark skiing? Let’s not call it the ultimate “goal” yet?let’s say an immediate achievement. It’s probably to complete stable Telemark turns in the Telemark position. Yes, that stance with one foot forward and one back. Here’s the key: that immediate goal is often a dead-end. Even after ten or more years, there may be little growth beyond it.
You’ve probably sensed it too: the goal of skiing itself is not the same as the goal of performing a stance. If that forward-backward foot stance aligned perfectly with the true goal of skiing, skiers could confidently discuss technique with one another. But in reality, looking at YouTube and elsewhere, it’s like this: 50% of people are working hard just to “perform” the stance. Of the remaining half, half try to approach the power of Alpine skiing, while the other half go back to “performing” with weaker equipment. That’s my observation. So, what is the real goal in skiing? I think we can explain it like this:
For example, fully fixed high-cut Alpine boots have a goal only Alpine skiing can reach. On the other hand, heel-free Telemark systems have their own goal. Light, agile XCD gear has its own goal too. I like to think about capturing the essence of each goal in a single, catchy word. Isn’t that a beautiful way to divide things? One more point: in Telemark, spreading your feet forward and back is possible, and often treated as an icon of the technique. But unfortunately, it’s not necessarily an advantage in downhill skiing. Now, I want you to consider this: if we set “dexterity” and “softness” as the goal, how do we develop from there? |
||
|
Now, everyone, there are two elements to braking: skidding and digging. On hard slopes, we use skidding, while in conditions with deeper snow, we use digging. The key point here is that in either case, you primarily use the uphill ski. You extend your joints to flex the ski and push your weight into it. One important detail: only the rear half of the ski is flexed?you don’t flex the ski from tip to tail. I’ll explain the finer points of the technique another time. After completing the braking action, you contract your joints to return. When you contract and return, the ski briefly lifts off the snow, and your speed increases. If you have pre-twisted your body, you can also rotate instantly at that moment. In other words, if you push and extend the uphill ski in the direction you want to twist, the ski naturally rotates when you return?in the air and quickly. After that, you gradually apply force to the later part of the opposite side’s outside edge and repeat the same motion. This is the basic pattern of my skiing. |
||
|
||
|
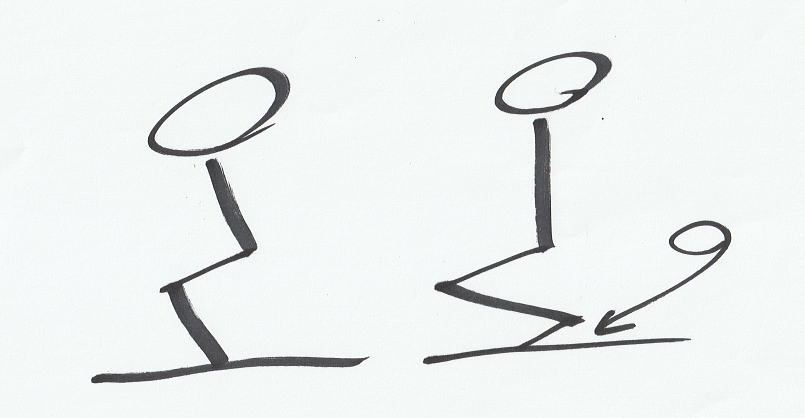
Everyone, when it comes to downhill skiing, people often talk a lot about turns?specifically, the shape of your turn. Sure, making turns is fun and exciting?I get that, too. But if we look at it from an instructor’s perspective, the most important thing is not how to perfect your turn shape, but how you control your speed while going down. You might be surprised, but the shape of your turns and speed control are actually unrelated. So let’s focus on the core of speed control: braking. The key is whether your brakes work properly and whether you can adjust the pressure as you like. If you do this right, speed naturally comes along. On a slope, physics does the work?you’re going to accelerate anyway?so speed control really means controlling deceleration. There are two ways to use brakes. One is to wait for your speed to drop naturally, and the other is to actively control your speed at will. The first one is common among skiers who think skiing is mainly about turns?they wait for the speed to drop before starting the next turn. In Japanese, this “waiting” state is sometimes called ‘riding’. It works fine on intermediate slopes, but on steep terrain it becomes difficult. After all, do you really make turns on a 40-degree slope? Most likely, you’ll just slide sideways. This is where universal braking techniques come in. On hard slopes, we use skidding. That works well even on groomed runs. But when there’s deeper snow?powder, crust, or anything thick?your skis sink and skidding becomes difficult. So what do you do? You dig your skis. When the ski sinks, it slows you down. Many of you may have experienced sudden stops and falls?that usually happens for two reasons. The first reason is that the entire ski sinks. More specifically, the front part of the ski creates resistance and suddenly stops you?hence the “uh-oh” moment. That’s why, when burying skis, you only need to use the back half from the boots back, not the whole ski. You use this as your brake pressure control. The second reason is ‘riding’, meaning your weight is constant. That doesn’t give you real control. So instead, convert your weight into pressure. Think of it as push and pull. This lets you adjust how much the ski sinks, which directly controls your speed. In short: dig to slow down, lift to speed up. The same idea applies to skidding: skid the tail to brake, then release to accelerate. Here’s something that might surprise you: the leg that mainly performs this braking is your uphill ski, not the downhill ski. Specifically, the outside edge of the uphill ski, and the back half. The downhill ski has other functions, which we’ll cover separately. To sum up: in downhill skiing, the most important thing is braking, not turn shape. Braking is mainly done with the back half of the outside edge of your uphill ski. On hard snow, slide it to brake; on thicker snow, bury it to create resistance. Brakes aren’t something you wait for?they’re something you actively operate. Adjust pressure: extend and push, contract and pull. This push-and-pull motion is where heel-free skiing really shows its advantage. |
||
|
Alright everyone, compared to alpine skiing, heel-free skis allow you to make turns with a smaller radius. Why? Because you can create a straighter rotation axis. For example, when you shorten or compress your body, your heels lift, allowing your knees to move forward. This keeps both feet directly under your upper body. The line connecting your upper body and feet becomes your rotation axis. A straight rotation axis naturally creates the smallest turn radius?like spinning almost in place. Important note: compressing your body is different from squatting down. The moment you compress, the skis lift slightly off the snow. In the air, your skis rotate most freely. From the outside, this might look like a short turn. But if you slow down this motion, you can easily turn it into a medium or long radius turn. Also, before you compress, you must extend your body. As I mentioned before, extending the body is how you apply a brake. By extending the joints of the uphill leg, power is transmitted from your ankles to the skis, causing the tails to skid?and that acts as a brake. In deeper snow, sinking the tails does the same thing. So to summarize: extend your body to brake, compress your body to turn. That’s the fundamental movement in heel-free skiing. |
||
|
||
|
||
|
||
 |
||
|
First of all, I want to clarify that the way I categorize A-tele and B-tele is just my own framework. It’s not a standard way of thinking in Japan. The important point is that B-tele is my original concept. It took me about 25 years as a telemark ski instructor to develop this idea. I’ve attached some reference material above, which I hope will help you understand it. Now, let’s talk about A-tele. What is A-tele? Simply put, it’s all telemark skiing techniques other than B-tele. In other words, general telemark skiing falls under A-tele, including technical theories and teaching methods. I didn’t reject A to create B; my position is simply that both A and B exist. A has been around for a long time, and its existence has reasons. There’s a purpose to dropping your hips and spreading your feet front-to-back. That purpose could be physical, or it could relate to the inner experience: maybe it’s fun, exciting, challenging, or gives you that “I’m really skiing” feeling compared to alpine skiing. I myself spent years operating entirely within A?trying to figure out how to stabilize the telemark position within a turn, or what meaning there might be in spreading the feet front-to-back. Back then, turns came first, and the telemark position was something to fit into that turn. That was basically my role as an instructor up until around 2008. The trigger for creating B-tele came from a question: “Right below the ridge, on this extremely steep slope, do I really want to turn? Isn’t it dangerous?” On icy, steep slopes, we first slide sideways. In such situations, does it even make sense to teach turns? If you spread your feet front-to-back here, it could be disastrous. Do you raise the heel of your uphill ski? What is a turn? Is the telemark position even necessary? These questions came from skiing in the mountains, not on resort slopes. What became clear is that what you really need in downhill skiing is brake control. People who are good at braking are good at controlling speed. I focused on braking itself and developed B-tele. To summarize: A is about turn shape, B is about braking. B works in any slope or condition. With B, you can safely get down. Developing B also revealed a gift: in many ways, telemark skiing can be superior to alpine skiing. A demonstrates its value in conditions where you can enjoy turn shape?resort slopes, comfortable angles, safe environments?where you can move actively, enjoy bold turns, and even the physicality of the skiing. On the other hand, the world of B-tele emphasizes skiing more quietly, softly, and lightly. Both A and B have their place, and understanding both allows you to choose the right approach for the situation. So in summary:
Understanding both and using them appropriately is how I suggest approaching telemark skiing. |
||
 |
||
|
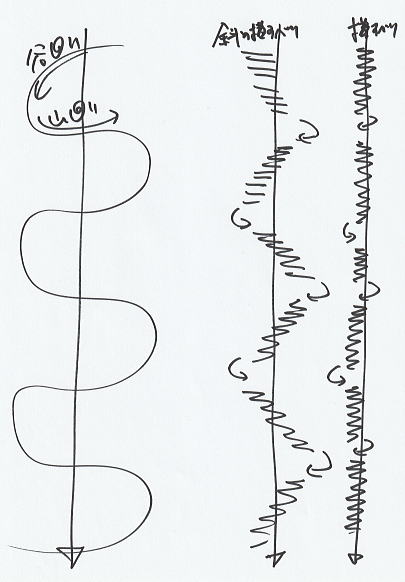
Everyone, today I want to talk about Lead Change. To be clear, in B-tele, there is no such term and no intentional movement that corresponds to it. You might watch a video and see that the skis clearly swap front and back each turn, and think, “That’s a Lead Change, right?” I understand why you would say that. But in my system, there is no intentionally executed Lead Change. Why? Because in B-tele, we don’t base our skiing around the shape of the turn. As I’ve mentioned before, the focus in B-tele is on braking. On hard slopes, this means skidding; in thicker snow, it means digging the ski. That is the concrete action we use to control speed. Now, what appears to be the Lead Change within a turn? In my perspective, it’s better described as a spin?a quick directional change in the air, using both feet simultaneously. After that, we use the uphill ski to brake and adjust speed with a mix of skidding and burying. During this, we press diagonally with the ankle of the uphill foot. That’s why in high-cut boots, the heel looks like it rises, and in loose low-cut boots, the heel may barely rise showing the motion closer to what’s really happening at the ankle. Whether the heel appears to rise or not depends on the boot, not your stance width or foot placement. So that covers the role of the uphill ski for braking. What about the downhill ski? It simply gets pushed forward. The front position of the downhill ski results from the push created by extending the uphill ski in the air after the spin. By extending the uphill leg, the downhill leg naturally moves forward. Here, the sense of “forward” is crucial. Your foot can position itself in front of your body, which is easier if your boots allow ankle extension?again, low-cut boots help. And you do this while moving, while applying the necessary pressure, guiding the ski forward smoothly?like slicing sashimi with a sharp Japanese knife. To summarize:
In short, I am just repeating spins and brakes in straight downhill skiing. This is why the thinking is not turn-arc based, and why I separated B from A. |
||
|
||
|
Everyone, today I’m going to explain using the terms A and B. This is just for clarity and easier understanding. First, A-tele. The key point in A-tele is that the main force used to flex the skis comes from your own body weight. There are debates about weight distribution?“70% on the front ski” or “80% on the back ski”?but in any case, body weight is the main factor. The underlying image is still very much about the turn shape. On the other hand, in B-tele, we focus only on the uphill ski. The source of force comes from pushing, and the key is how much you push, how much you skid, or how much you bury?using only the tail of the ski. Importantly, this is done without leaning back, and the purpose is braking. This B-tele technique works better with low-cut boots rather than high-cut boots, because the greater the ankle mobility, the easier it is to control the push, skid, and bury actions. The idea behind B-tele relies on having this freedom of movement. In summary:
|
||
|
Everyone, think about bicycles and cars for a moment. They both have brakes. When you pick up speed, you apply the brakes to slow down. Sometimes you even apply a gentle, continuous brake while going downhill. Skiing works the same way. In B-tele, we apply a gentle, continuous braking force while feeling out the snow conditions as we descend. So what is braking on skis? It’s all about how you orient and use the skis to create resistance. On hard slopes, I create friction by skidding the skis sideways, which acts as a brake. We call this "skidding." In deep snow, I dig the skis into the snow to slow down, which we call "digging." Depending on the conditions, we combine these two techniques. Here’s the key point: bicycles and cars don’t slow down by turning left and right repeatedly. They slow down using the brake itself. Skiing works the same way. Deceleration comes from braking, not from turn shape. In my terms, on hard slopes we use skidding, in deep snow we use digging. That’s braking. Not the arc of the turn. And honestly, this might be a revolutionary way to look at skiing. |